Shop
The Platyno Shop is currently available on request. Are you interested in the Platyno Shop? Please send us an inquiry via our contact form.
General
With the Shop module you turn your SharePoint into a configurable online store for your employees - fully within SharePoint.
Information about the usage of the store can be found in the following section:
- The Usage section covers an overview of the features and an introduction on how to use the Platyno Shop.
Information on configuration and administration of the Platyno Shop can be found in the following sections:
- The Data maintenance section covers the creation of products and images, as well as the general setup of the store.
- The Configuration section covers display and user settings for the Platyno Shop.
Usage
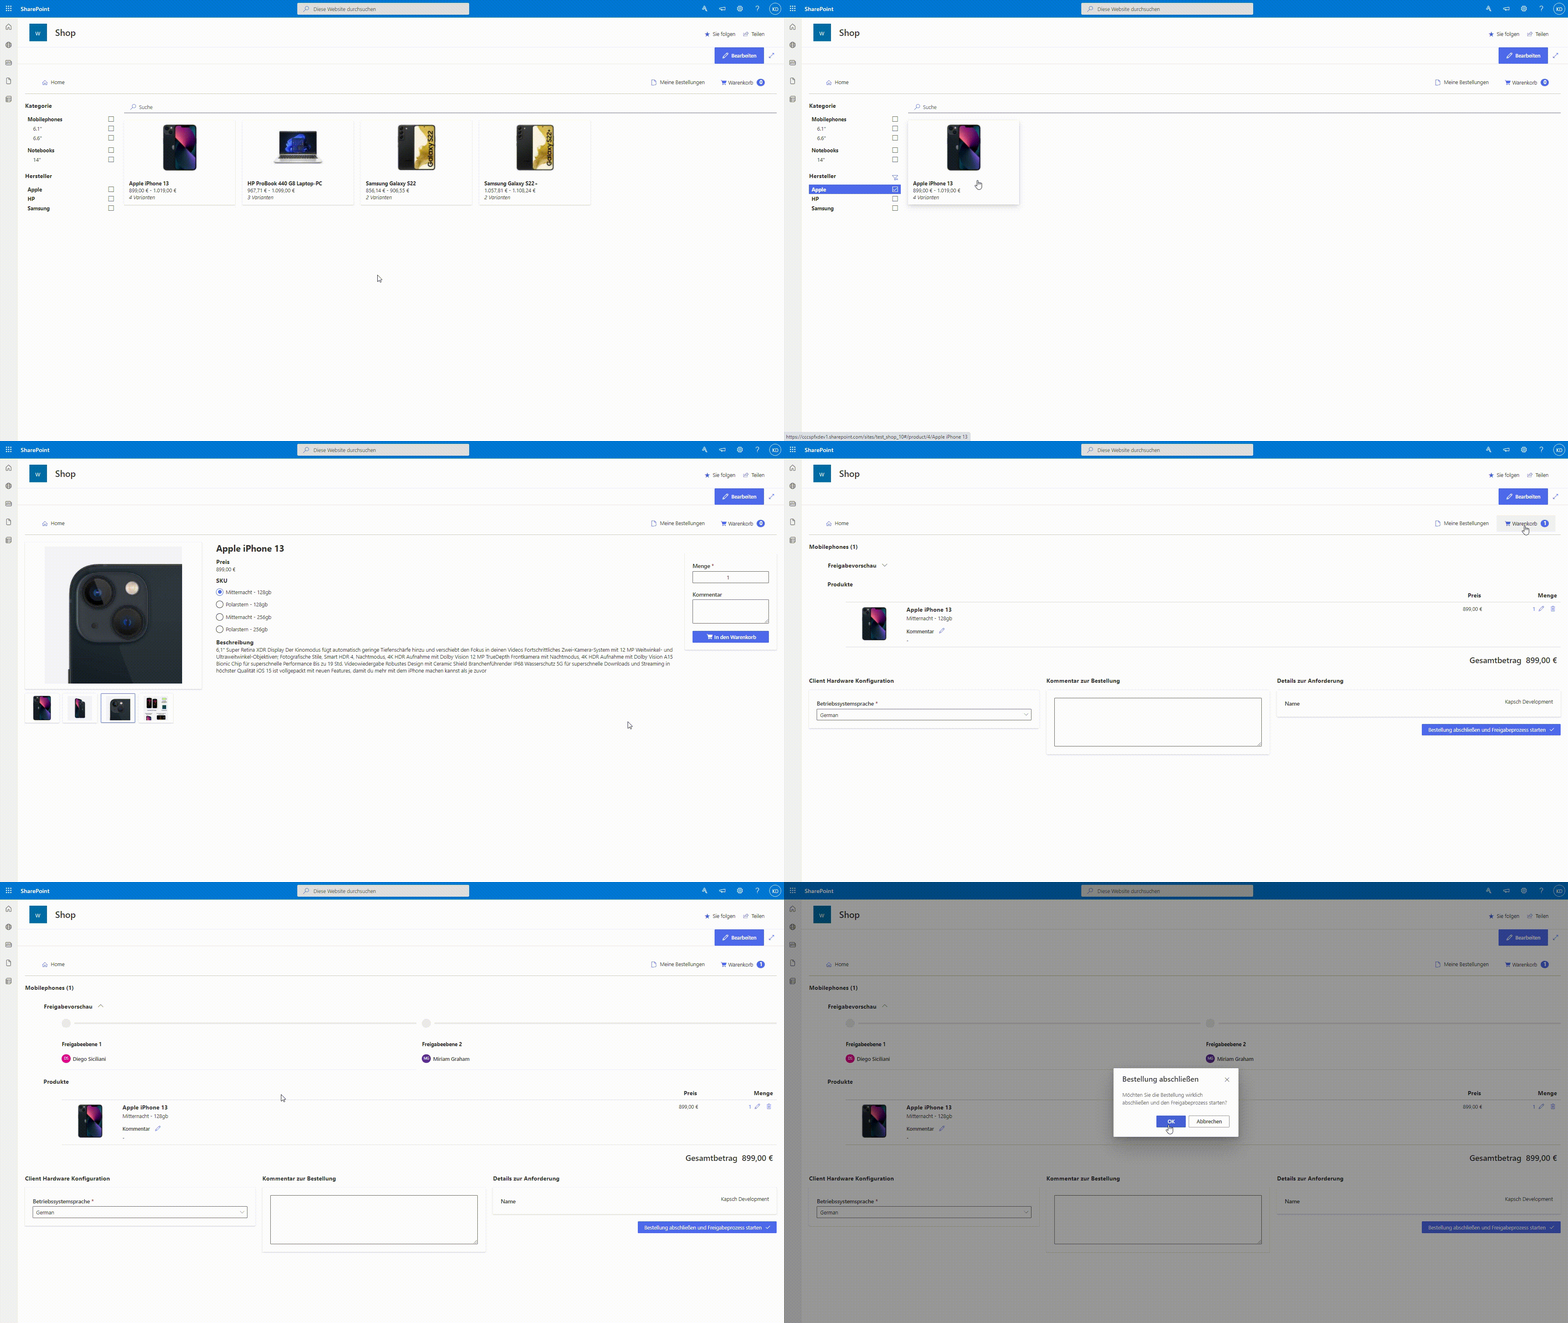
Go to the homepage of the store. In the left bar you can filter the products by category or manufacturer. With the search bar above the products, you can search for products based on their title. Click on a product to get to the detailed product view. From here you can select the desired model or product variant (SKU). In the right dialog you can set the quantity and click on the button to add the product to your shopping cart.

The menu item Placed orders will take you to an overview of your orders. Switch to My approvals for a listing of orders that you are involved in in the approval process. Use the All accessible orders view to see information on all orders to which you have the appropriate permissions to view.

Data maintenance
The store is configured using the data structures created for the Platyno Shop. These include lists and document libraries that can be accessed via the site contents.
For the initial configuration, it is recommended to create the entries sequentially. Many lists reference and require the information and entries of other lists.
Initial configuration
For the initial configuration of the shop, the following order is recommended:
Configure companies with
ShopCompaniesConfigure approval processes with
ShopProcessesandShopApprovalConfig(and optionallyShopApprovalProcessMessage)Configure company sets with
ShopCompanySetsAllowedandShopCompanySetsDeniedAdd product information
Add product images with
ShopProductImagesAdd attachments with
ShopProductAttachmentsAdd manufacturers with
ShopManufacturersAdd categories with
ShopCategories(optional) Add recipients for notifications when low inventory is reached with
ShopInventoryWarningRecipients
Add products with
ShopProducts
Data structures
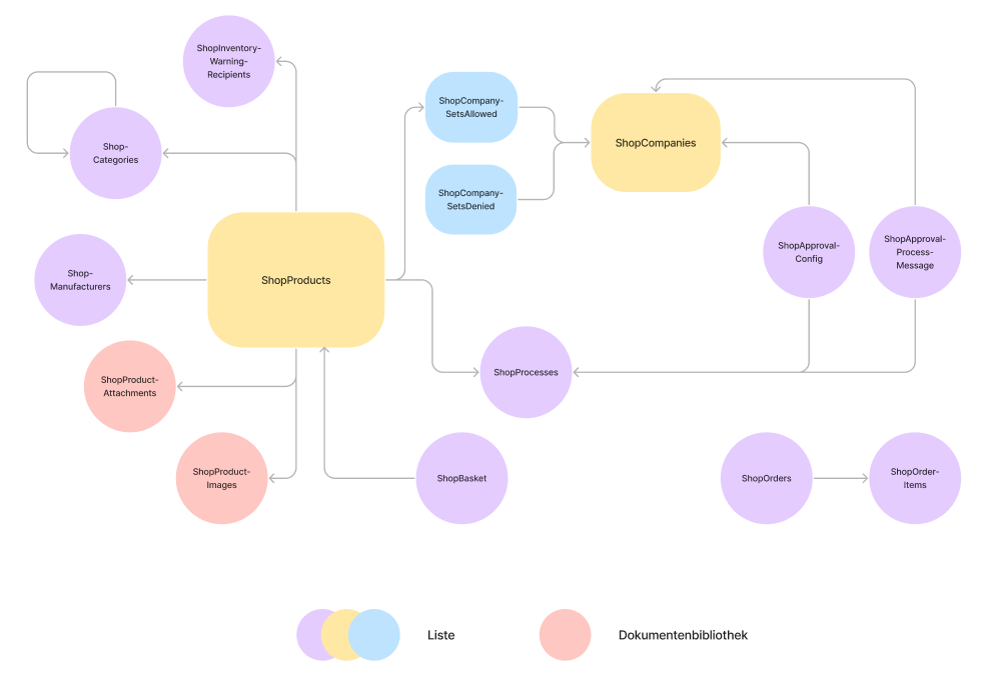
An overview of the data structures created for the store and their relations can be found in the graphic:

Configure company
Required lists: ShopCompanies
A Company is used as a distinction within a tenant, for example to show products for one company and hide them for others. It also allows the use of different approval processes per company.
It is required that the company name in the ShopCompanies list matches the selected user profile property for Company in the SharePoint user profile service.
Go to the ShopCompanies list in the site contents to create a new company.
Create a new entry in the list and give the company a title.
The distinction between Companies and the members of a Company is handled by the SharePoint user profile service. It is important that the title matches the name of the company in the SharePoint user profile service.
Configure approval process
- Required lists:
ShopProcesses,ShopApprovalConfig,ShopApprovalProcessMessage
Custom approval processes can be defined for products, these start automatically as soon as a product is being ordered. In an approval process, approvers can be defined. Approvers can approve or reject an order.
Prerequisite for adding an approval process is at least one created company in the ShopCompanies list. More information about creating a company can be found here.
Within the site contents navigate to the list ShopProcesses to create a new approval process.
Create a new entry in the list and enter the title of the process.
Change to the list ShopApprovalConfig to configure settings such as the required people for the approval process.
Overview of the configurable columns
Column Required Description Title Yes Title of the configuration (only required for creating the entry in the list) ShopProcess Yes Specifies the corresponding ShopProcess Company Yes Specifies the company for which the configuration applies ApprLvl1Approvers, ApprLvl2Approvers One or more approvers, that approve the order ApprLvl1Mode, ApprLvl2Mode Yes Specifies how many people are required to approve the order
Disabled: No person required
Everyone: All people specified (from the columns "ApprLvl1Approvers" or "ApprLvl2Approvers") are required to approve the order.
Anyone: At least one person is required to approve (from the columns "ApprLvl1Approvers" or "ApprLvl2Approvers")ApprLvl1AmountThreshold, ApprLvl2AmountThreshold Yes Item quantity of which the approval of Level 1 Approvers (or Level 2 Approvers) are required. Default is 0 (= always) ApprLvl1NotifyBelowThreshold, ApprLvl2NotifyBelowThreshold Specifies, whether the approvers should receive a notification for orders smaller than ApprLvl1AmountThreshold or ApprLvl2AmountThreshold ApprLvl1AutoAssign, ApprLvl2AutoAssign Yes Instead of the people specified in the ApprLvl1Approvers (or ApprLvl2Approvers), the users specified as managers in the user profile service approve the order. RecipientsOnSuccess Email addresses of the people, that should receive an order confirmation after an order is complete (seperated with ";") ShopAdministration Users or groups, that get additional access to the lists "ShopOrders" and "ShopOrderItems"
- Optionally a message or notification can be set up, that is displayed above the shopping cart, in emails and above the detail view of the order.
Open the list ShopApprovalProcessMessage to specify a custom message.
Overview of the configurable columns
Column Required Description Title Yes Title of the configuration (only required for creating the entry in the list) Company Yes Company, for which the message should be displayed Process Yes Process, for which the message should be displayed User User, for whom the message should be displayed Message Message that should be displayed; supports formatting Order Number to specifiy the position of the message (if multiple messages are defined)
Add company sets
- Required lists:
ShopCompanySetsAllowed(andShopCompanySetsDenied)
A company set is a group of companies. You can use a company set to specify whether a product is available or unavailable for a group of companies (a company set).
In the site contents, go to the ShopCompanySetsAllowed or ShopCompanySetsDenied library to specify a group of companies for which a product should be available or unavailable.
Create a new entry in the list and give the company set a title.
Enter the desired companies in the Companies field (the entries in the "ShopCompanies" list are available for selection). More information about companies and adding companies can be found here.
Add product images
- Required lists:
ShopProductImages,ShopProducts
Go to the ShopProductImages library in the site contents to add product images.
Create a new folder in the library and add the desired images.
Switch to the ShopProducts list and edit an entry or create a new one.
Enter the name of the just created folder in the ImageFolder field.
Add manufacturer
- Required libraries:
ShopManufacturers.
Switch to the ShopManufacturers list in the site contents to add manufacturers for a product.
Create a new entry in the list and assign a title to the manufacturer.
Optionally, you can set the order in the manufacturer filter on the home page. To do this, assign a value to the manufacturer under Sorting. The entries with the lower value will be listed higher.
Switch to the ShopProducts list and edit an entry or create a new one.
Select the manufacturer for the product in the Manufacturer field.
Add attachments
- Required libraries:
ShopProductAttachments,ShopProducts.
The attachments of a product are available for download in the product view.
Switch to the ShopProductAttachments library in the site contents to add attachments for a product.
Create a new folder in the library and add the desired files.
Switch to the ShopProducts list and edit an entry or create a new one.
In the AttachmentFolder field, enter the name of the folder containing the files for the product.
Add categories
- Required lists:
ShopCategories,ShopProducts
Switch to the ShopCategories list in the site contents to add categories for a product.
Create a new entry in the list and give the category a title.
Optionally, you can subordinate the category to another category. To do this, select a category that serves as a parent category under Parent.
Switch to the ShopProducts list and edit an entry or create a new one.
In the Category field, select the category for the product.
Add products
- Required list:
ShopProducts
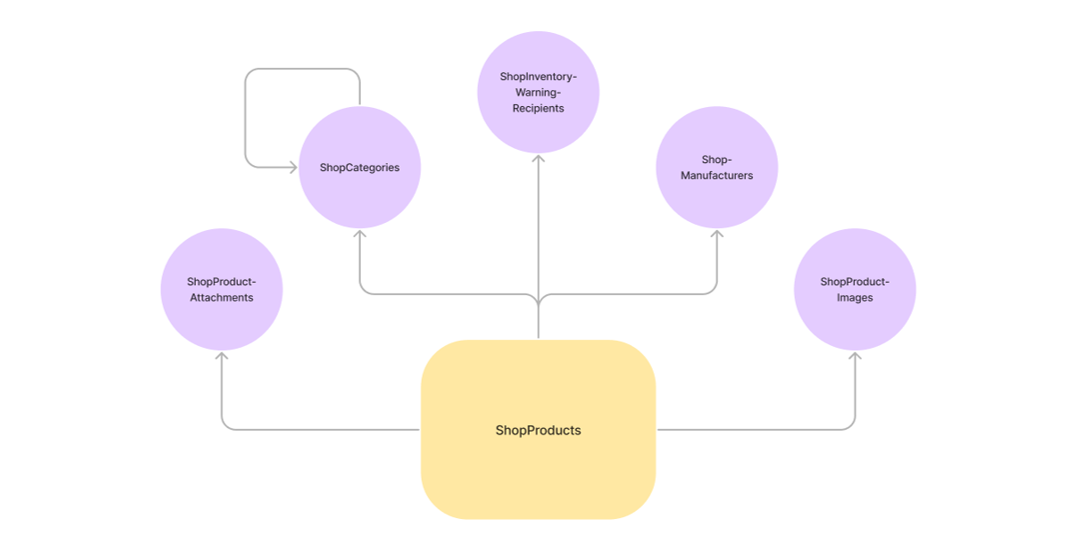
Adding and editing products is done through the ShopProducts list. Some of the fields in the ShopProducts list refer to entries in other lists.
Prerequisite for adding a product is at least one Approval Process in the ShopProcesses list. More information about creating an approval process can be found here.
Furthermore, at least one company set is required for which the product should be available. More information about creating a company set can be found here.
It is recommended to create the required information beforehand when adding a new product.
Information that is referenced from other lists when adding a product
- Product images
Added with the libraryShopProductImages
More information about adding product images can be found here - Attachments
Added with the libraryShopProductAttachments
More information about adding attachments can be found here - Manufacturer
Added with the listShopManufacturers
More information about configuring manufacturers can be found here - Approval process
Added with the listShopProcesses
More information about configuring approval processes can be found here - Category
Added with the listShopCategories
More information about adding categories can be found here - InventoryWarningRecipients
Added with the listShopInventoryWarningRecipients
For more information about the fields and their purpose, see the overview of columns to configure in step 3.

Switch to the ShopProducts list in the site contents to add or edit products.
Create a new entry in the list and give the product a title.
Fill in the required fields to add a new product:
- Title
- SKU
- Price
- ShopProcess
- CompanySetsAllowed
- OrderAmountInterval
Information as well as an explanation of the columns of the ShopProducts list and their purpose can be found here:
Overview of the configurable columns
Column Required Description Title Yes Title of the product Description Description of the product (more precisely of the product variant / SKU) SKU Yes Title of the product variant ("Stock Keeping Unit") ValidFrom Date and time from when the product should be available ValidTo Date and time till when the product should be available ImageFolder Name of the folder in the library "ShopProductImages" that includes the images of the product Price Yes Price of the product Inventory Saves the current inventory quantity of the product EnableInventoryManagement Specifies if the current inventory quantity is considered in the approval process ShowInventoryInProductDetail Specifies whether the inventory quantity of the product is being shown in the product details AllowNegativeInventory Specifies whether the inventory can be less than 0 InventoryWarningThreshold Specifies the inventory quantity for which a notification should be send when it is being reached ItemNumber Product number, that can be specified and is shown within the product view as well as in emails PriceInfo Additional information that is displayed besides the price OrderAmountInterval Yes Specifies the amount by which the quantity can be increased/decreased. Default value: 1 DownloadOnly Specifies whether the product can only be downloaded and not be added to the basket AttachmentFolder Name of the folder in the library "ShopProductAttachments" for the files that should be available for download in the product view Manufacturer Name of the manufacturer (Available are the entries of the list ShopManufacturers)ShopProcess Yes Specifies the approval process (Available are the entries of the list ShopProcesses)
More information about configuring approval processes can be found hereCategory Specifies the category of the product (Available are the entries of the list ShopCategories)
More information about adding categories can be found hereRelatedProducts Products, that are displayed as related products (Available are the entries of the list ShopProducts)CompanySetsAllowed Yes Company set, for which the product should be available (Available are the entries of the list ShopCompanySetsAllowed)
More information about adding company sets can be found hereCompanySetsDenied Company set for which the product should not be available (Available are the entries of the list ShopCompanySetsDenied)
More information about adding company sets can be found hereInventoryWarningRecipients Recipients, that are notified when "InventoryWarningTreshold" is reached (Available are the entries of the list ShopInventoryWarningRecipients)
Configuration
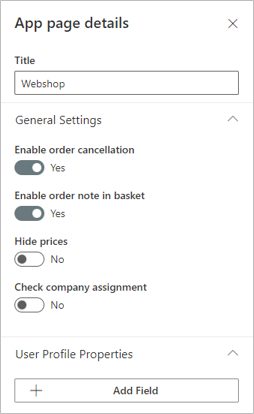
Select Edit on the store home page to configure your web store.

General Settings
With Enable order cancellation users are allowed to cancel their orders.
With Enable order note in basket a note field for comments on the order in the shopping cart is being displayed.
With Hide prices you can hide the prices of the products.
With Check company assignment the user will only be shown the products that are also available for the users company (and configured with the ShopCompanySetsAllowed list).
In addition, with the Check company assignment field, a company field appears under User Profile Properties that must be mapped to a user profile property to enable differentiation of products between companies.
User Profile Properties
With User Profile Properties you can record additional properties of users in orders.
- With Add Field you create a new field, which will be stored in the ShopOrders list when an order is placed.
- To do this, extend the ShopOrders list with a column of type Single line text.
- Give the additional field a name and optionally add a translation that will be displayed when the page is in the corresponding language.
- Select the desired user profile property in the left field and map it to the corresponding column of the ShopOrders list.
The user profile property will now be recorded in the ShopOrders list, as well as displayed in the shopping cart under Request Details.
Additional Order Properties
Additional Order Properties allows you to configure additional fields that users must fill out in the shopping cart before completing the order.
Under Section Heading you can set the header for the section in the shopping cart where the additional fields will be displayed.
- With Translate you can define additional translations for your heading, which will be displayed when the pages are in the corresponding language.
With Add Field you create a new field that can be filled in the shopping cart.
To do this, extend the ShopOrders list with a column of type Select.
Specify the name of the additional field. In addition, you can use Translate to add a translation for the label that will be displayed when the page is in the corresponding language.
Select the appropriate column from the ShopOrders list.
The following fields are available for selection by default, and can be added additionally:
- OrderKeyboardLocalization: Allows you to select the language for the keyboard layout.
- OrderOSLocalization: Allows the selection of the language for the operating system.
- OrderSystemLocalization: Allows you to select the language for the system language.
- Review Order Selection: Allows you to select whether to review the order (Yes, No, Maybe).
Display Settings
With Show category filter you can define whether the category filter is displayed in the store or not.
With Show manufacturer filter you can define whether the manufacturer filter is displayed in the store or not.
With Number of products per page you can define how many products are displayed per page.
Workflow Settings
With Workflow URL to submit new orders the URL of a HTTP trigger is specified, which starts the flow for processing the order.
With Workflow URL to cancel order the URL of a HTTP trigger is specified, which starts the flow to cancel the order.
Use Authentication mode to specify the App Registration Client ID for workflows that require authentication.