Installation & Update
On this page you will find the instructions for installing Platyno.
To make the installation as easy as possible, we have summarized the most important questions and steps in the following sections:
Requirements
Here is an overview of the requirements for installing and updating Platyno. Before installing or updating a module, please ensure that you fulfill one of the following roles:
- App-Catalog Owner
- Site Collection Administrator
- SharePoint Administrator
- Global Administrator
If no app catalog exists in your tenant, you can create one with this instruction.
Setup of Platyno Modules
Installing Platyno modules can be done in two ways. The installation via the Administration Center enables the installation of the Platyno modules with only a few clicks. Alternatively, the Platyno modules can be installed manually via the SharePoint App Catalog.
Option 1 - Without Administration Center
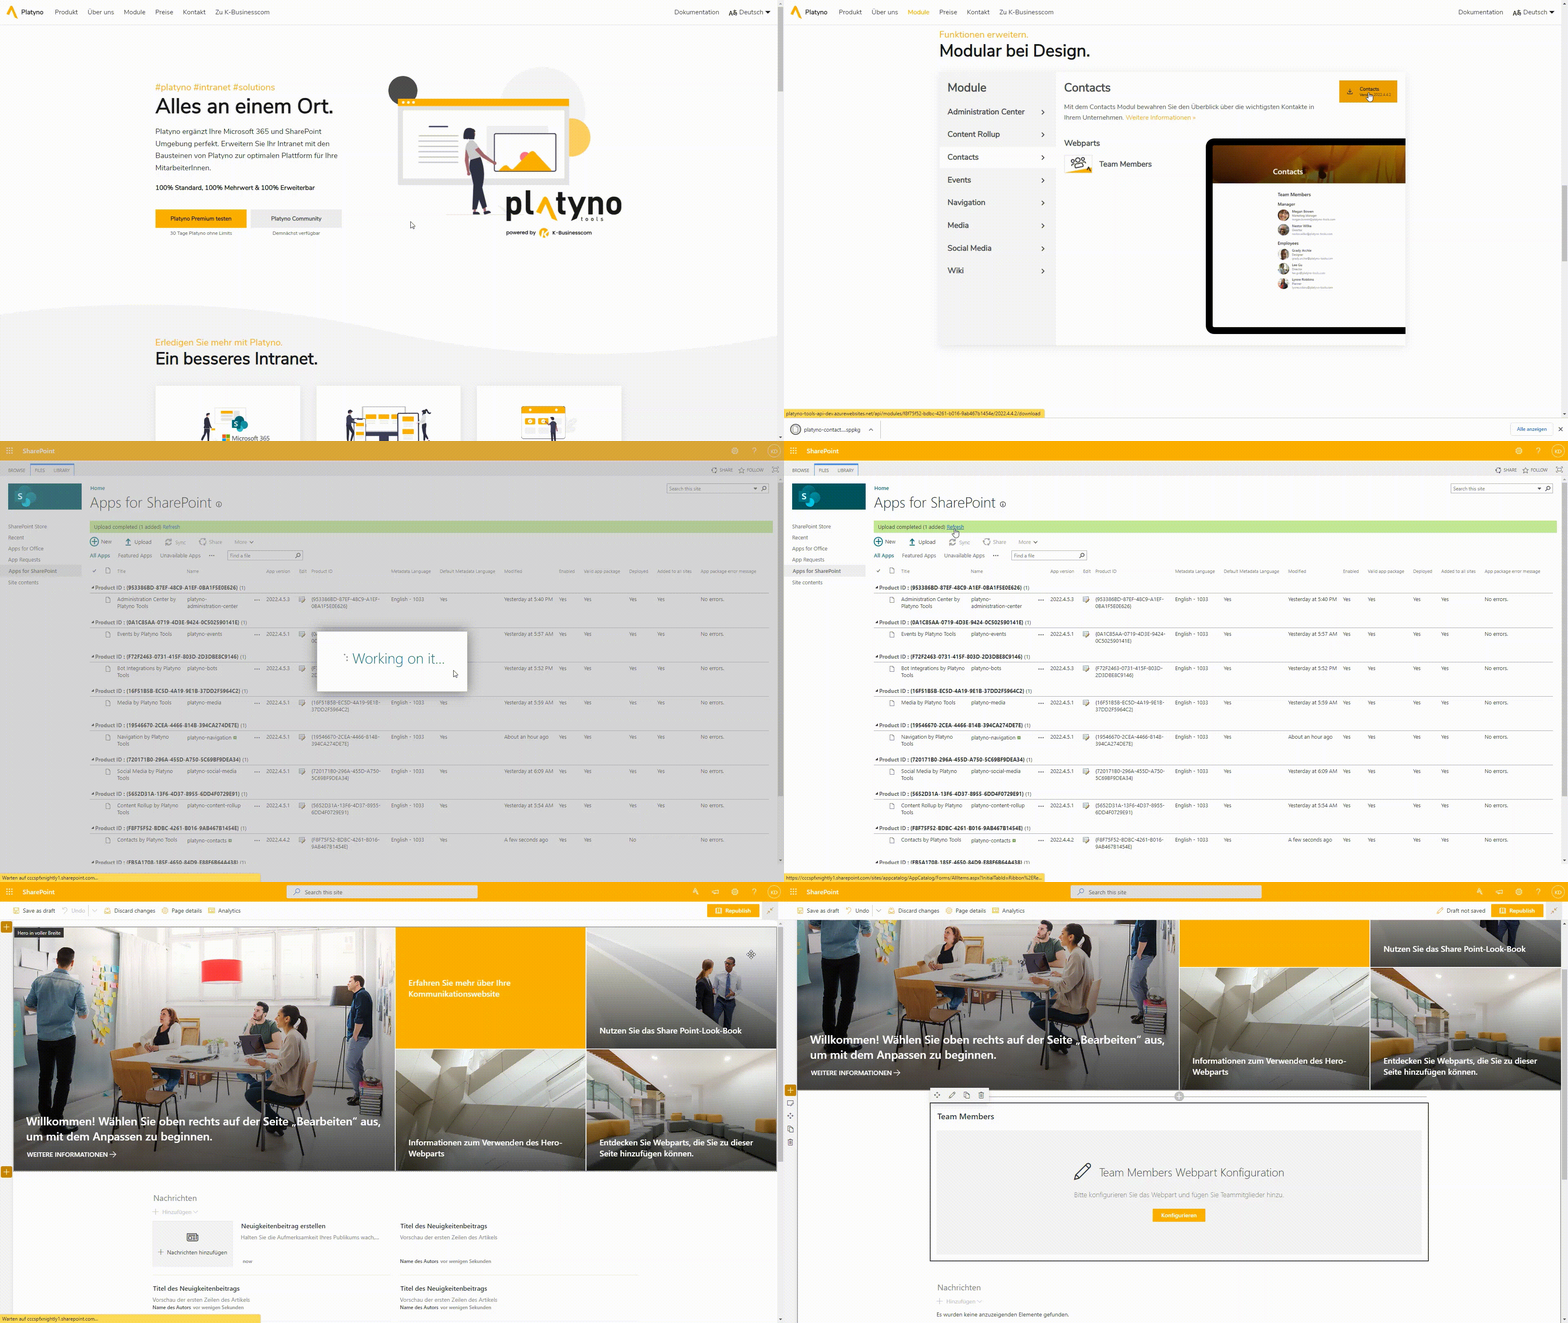
Step by step:
Go to the Modules section on the Homepage or go to a specific module in the documentation. Select the module you want to install and download it.
Then open the App Catalog. More information about the App Catalog can be found here. Go to Apps for SharePoint and drag the downloaded file into the App Catalog.
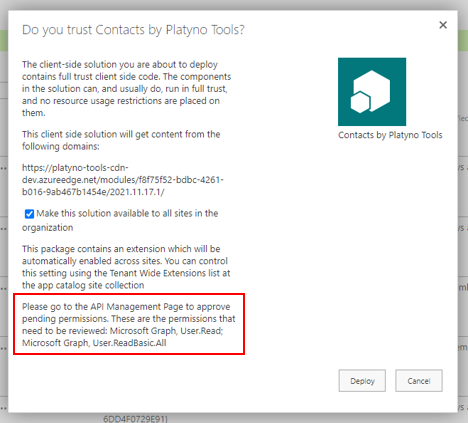
In the appearing pop-up window, it is important to select the checkbox to make your solution available on all SharePoint Site Collections of your M365 tenant.
InfoIf API Permissions are required for the installed module, a hint about the necessary API permissions can be found at the bottom of the pop-up. More information can be found here.
Click Deploy to install the module.
Finally, click Refresh to refresh the page. The web parts of the installed module can now be used on all SharePoint Site Collections.
Information on file namesThe downloaded file should not have parentheses with a number at the end of the file name. This occurs when the same file is downloaded several times. Here is an example of a suitable file name: "platyno-contacts.sppkg". File names like "platyno-contacts(1).sppkg" are incorrect.
Option 2 - With Administration Center
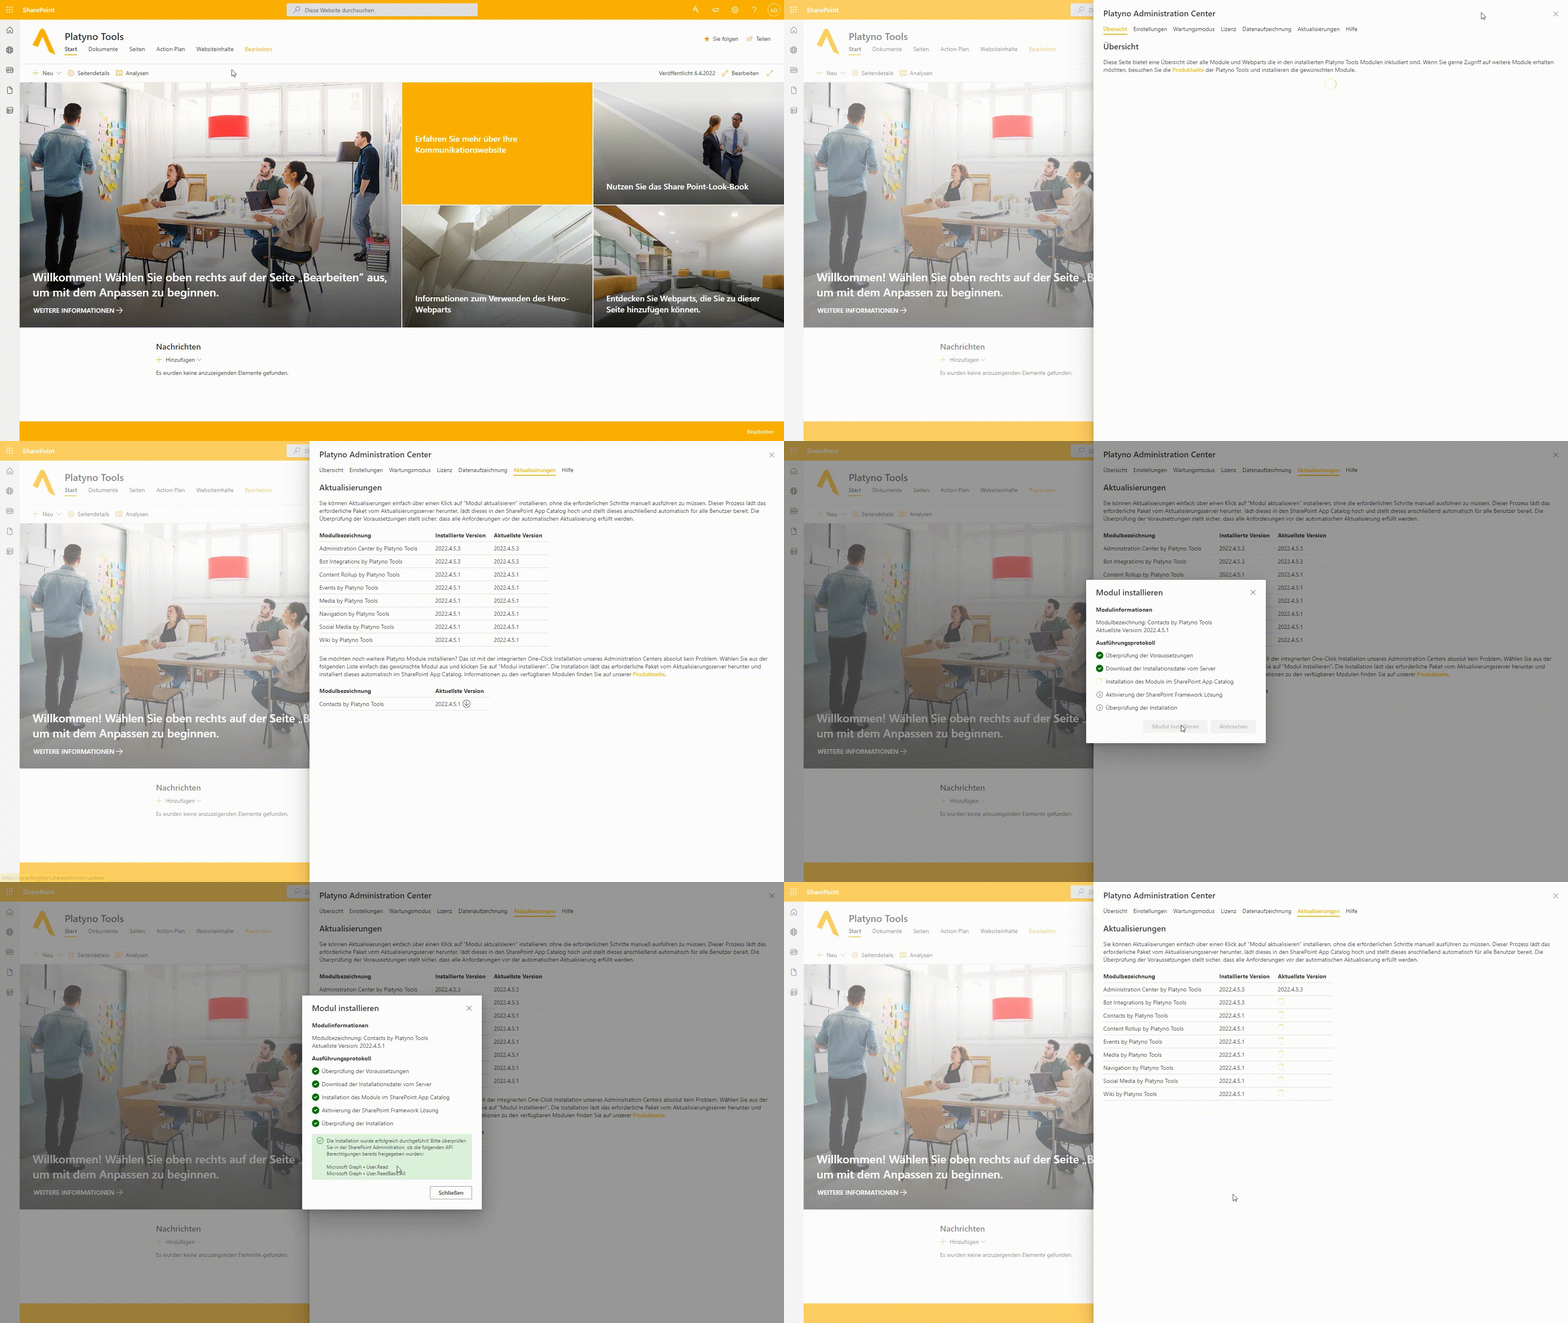
Prerequisite for installing additional modules via the Administration Center is an installed version of the Platyno Administration Center. If you do not have the Platyno Administration Center, you can use this instruction to install the Administration Center on your tenant.
Step by step:
On your SharePoint site, open the Platyno Administration Center. The Administration Center is located at the top right of the screen in the top link bar. Then go to the Updates section in the navigation bar.
From here you will see a list of all available modules. Click on the download icon to install the desired module on the tenant.
InfoIf the new module requires API Permissions, there is a note at the end of the popup about the required API permissions. More information can be found here.
Update of Platyno Modules
Updating Platyno modules can be done in two different ways. The instructions for an automatic update can be found here. The second option explains how to manually update Platyno modules.
Option 1 - Automatic Update
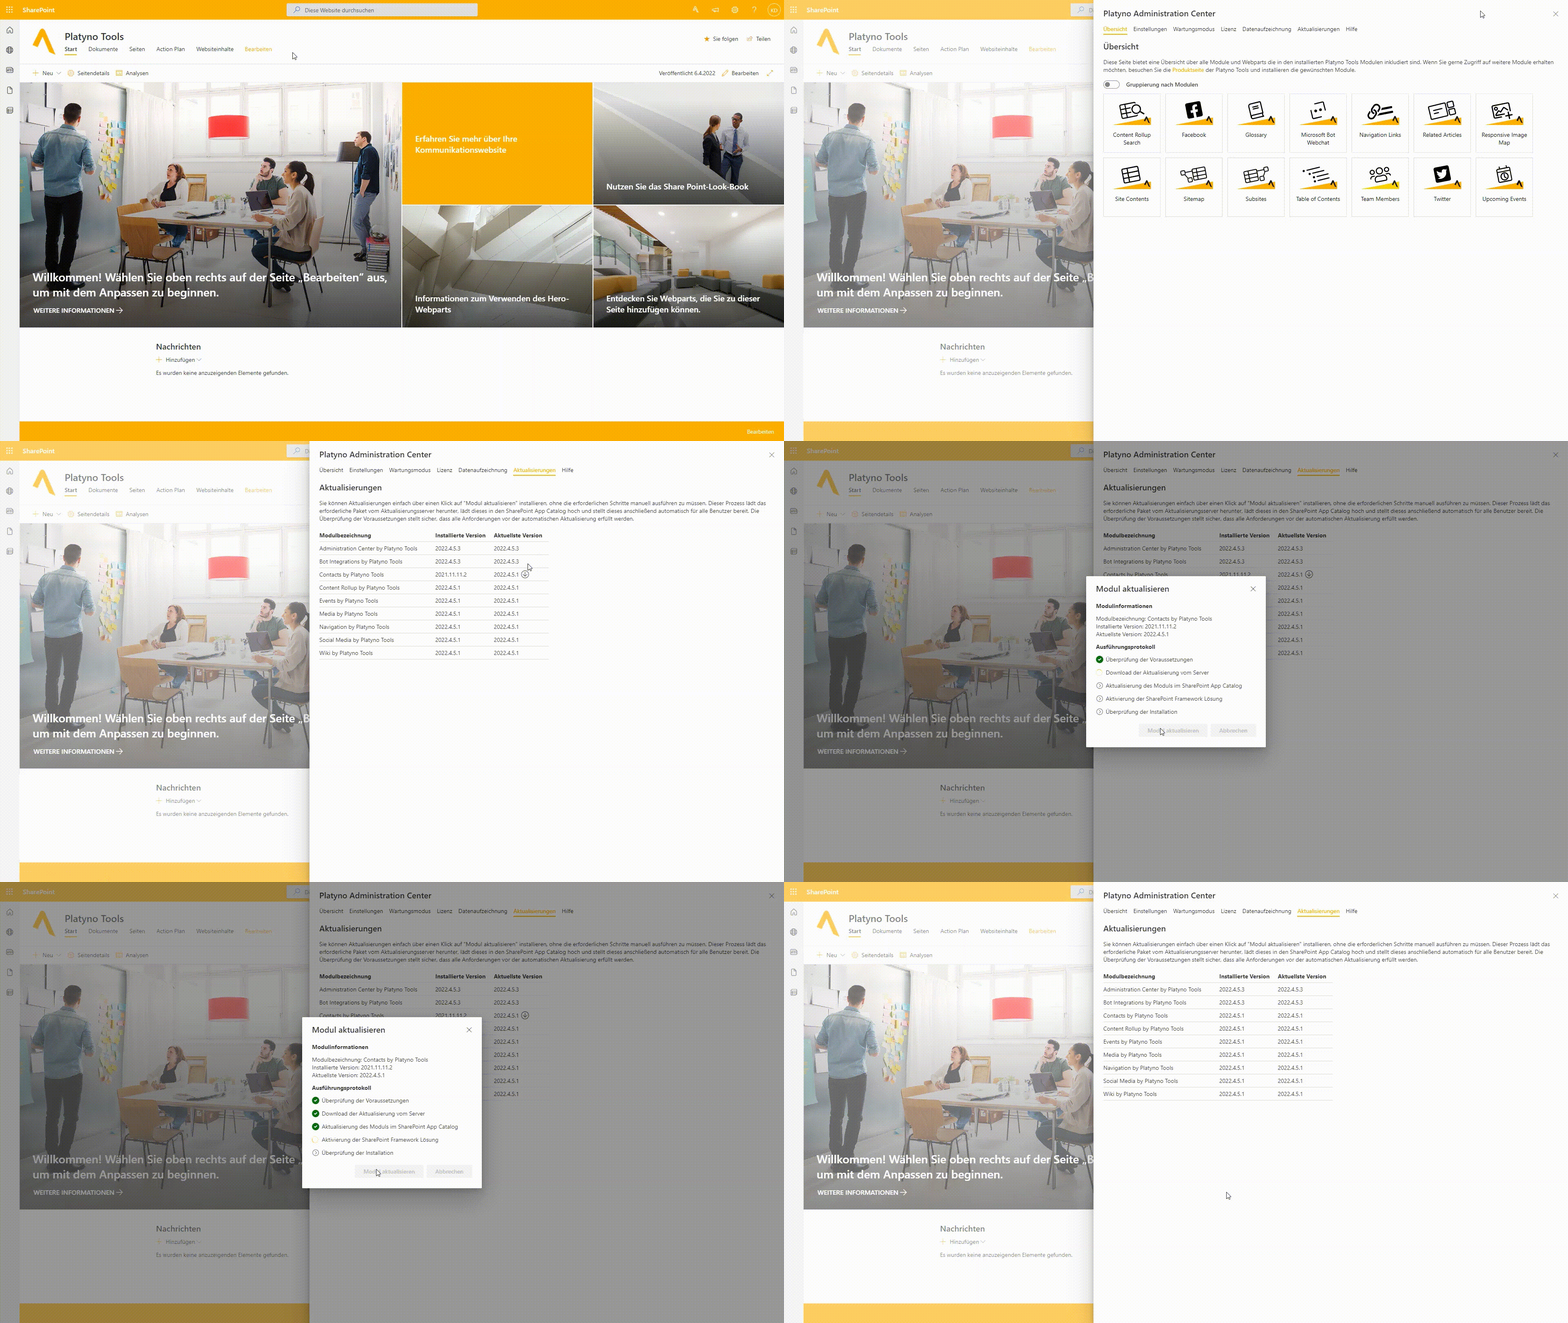
Prerequisite for the automatic update of a Platyno module is, that you have installed the Platyno Administration Center. If you have not installed the Platyno Administration Center yet, you can use these instructions to install it on your tenant.
Step by step:
Access the Platyno Administration Center on your SharePoint site. The Administration Center is located on the top right of the screen in the top link bar. Next go to the Updates section in the navigation bar.
From here you can update any module having an update icon next to it.
InfoIf API Permissions are required for the new version of the module, a hint about the necessary API permissions can be found at the bottom of the popup. More information can be found here.
Option 2 - Manual Update
Step by step:
Go to the Modules section on the Homepage or go to the modules sections in the documentation.
Download the desired module, then access the App Catalog and go to Apps for SharePoint. If you are not familiar with the App Catalog, you can find a detailed documentation here.
The final step is to drag the downloaded file into the App Catalog. A popup indicating that the file already exists will appear. Click Replace to perform the manual installation. This will update the module to the current version.
InfoIf API Permissions are required for the new version of the module, a hint about the necessary API permissions can be found at the bottom of the popup. More information can be found here.
Information about file names.The downloaded file should not have parentheses with a number at the end of the file name. This occurs when the same file is downloaded several times. Here is an example of a suitable file name: "platyno-contacts.sppkg". File names like "platyno-contacts(1).sppkg" are incorrect.
API Permissions
General
To some extent webparts use APIs that require specific permissions. The required API permissions are not added automatically, but can be viewed and approved in the SharePoint Admin Center (for example at "contoso-admin.sharepoint.com").
In the SharePoint Admin Center navigate to Advanced - API access to find an overview of all pending or approved permissions. To approve API Permissions you need at least SharePoint Administrator Permissions or Global Administrator Permissions.
More information as well as instructions about approving API Permissions can be found here.
Note
If API Permissions are required for the installed or the updated version of the module, a hint about the required API Permissions will appear in the App Catalog as well as in the Administration Center.
When updating via Platyno's Administration Center:
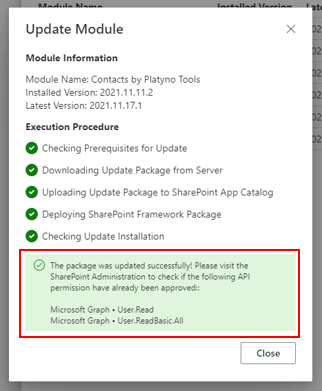
When installing or updating via the App Catalog:
Adding a Platyno web part
Adding new web parts to your SharePoint site can be done in a few steps. Visit the linked documentation for detailed instructions.